This is the Online version:
A wide world of culinary adventure awaits you! Choose a quick, simple recipe to start, and as your experience grows, widen your horizons to include new and daring combinations! Culturing probiotic food is a very simple task with the amazing Probiotic Jart(tm); this Quick Start Guide will tell you everything you need to know to get going and have a successful ferment the very first time. The design properties ensure an anaerobic environment that encourages the growth of beneficial microorganisms, and inhibits the undesirable ones. The Probiotic Jar(tm) will save you time and money. Read this Guide through first, including the recipe you’ve decided to first create; then re-read as you go. While this is a simple process, the details are important for success. After you have fermented a few batches of vegetables, the process will become automatic! |
|
Instructions
Start by washing your Jar and accessories (not sterilized), with your hands scrubbed. Additionally you might use a nail brush under your fingernails. Make sure all the kitchen tools involved are clean and dry before you begin.
Mix the brine first (according to the recipe chosen) and then wash your fresh organic produce, and prepare it (according to the recipe).
Pack it in the Jar, filling it up to the shoulder. Add the brine (if called for); just enough to cover the produce. Self-brining vegetables (cabbage & beets) may expand enough to push their way into the Airlock if the Jar is overfilled into the shoulder area of the Jar.
Depending upon the moisture content of self-brining vegetables, they may not need any additional brine to keep them submerged, which is important to prevent spoilage during the early stages of fermentation.
Place the Brine (Submersion) Bowl on top of the vegetables and brine. Some overflow of the brine will collect in theBrine Bowl; however, too much overflow will push directly up into the Airlock, which should be avoided. When the Brine Bowl is optimally placed, the brine should be just below the neck, and not to the top of the Jar. The Brine Bowl will displace some of the brine, so adjust the brine level so that it both covers the vegetables and the brine is not up into the neck of the Jar.
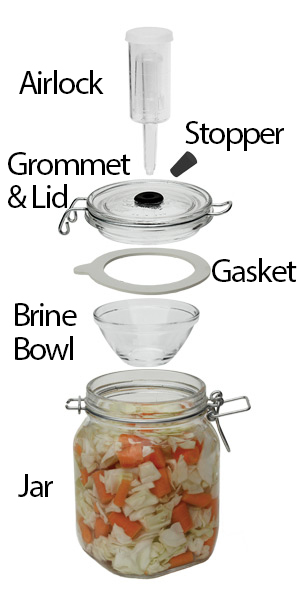
Assemble the Jar with Airlock: place the gasket on the lid, hook the lid onto the hinge of the Jar with the D-ring securing the lower band in place. Before locking the lid in place, fill the Airlock about half way with water (about two tablespoons), add the dome bubbler, and snap on the cap. Wet the tip of the Airlock, and using twisting motions gently insert it into the grommet. The tip of the Airlock should poke past the inside of the lid about ¼” (but no further), and the grommet should not turn in the lid, to ensure an airtight seal.
Place the Jar in a spot about 70ºF and ferment for the time specified.
Cover the Jar with a dark kitchen towel. Be sure to keep the cap on top of the Airlock uncovered to allow pressure to escape.
Move the Jar to cool or cold storage at the indicated time, and begin eating it when it’s ready.
That’s IT! Amazing, health-boosting, flavor-bursting, living food that you make at home which surpasses anything you can purchase at the store.
How It Works
Here are a few things that are important to understand about the superior process of culturing probiotic food in The Probiotic Jar(tm):
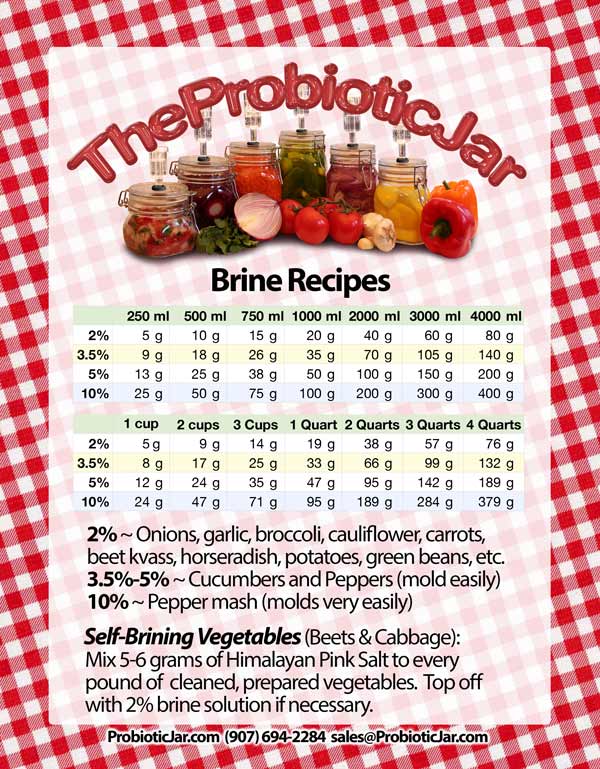
1. Lactic acid-producing bacteria (LAB) (the bacteria that do the work of fermentation) flourish in the dark, and light kills them. Wrap the Jar with a dark kitchen towel, and set it in a location in the kitchen where the sun does not shine directly. 2. Desirable LAB flourish optimally at about 70ºF while culturing most vegetables. Temperatures too low will slow down the fermentation process, and temperatures too high will either kill them, cause the fermentation process to proceed too quickly, and/or cause undesirable softening of the vegetable. Each strain of LAB has an optimal temperature range (yogurt LAB like 105-112ºF). Follow the temperature suggestions in the recipe for optimal results. 3. The time frames given are a guideline; when the bubbling looks like it’s all but stopped, it’s time to move it to cooler storage. 4. LAB thrive in a 2%-5% brine, and a 2% solution is generally enough salt to prevent the multiplying of pathogenic species of microbes. A couple exceptions are cucumbers and peppers which are more prone to mold, and do better with at least a 3.5%, up to a 5% brine. Pepper mashes need a 10% brine to prevent mold. |
|
|
5. LAB thrive in the absence of oxygen. In the first few days, as carbon dioxide is formed by the initial fermentation, the bubbles rise to the top, forcing oxygen out of the Airlock, creating a perfect anaerobic, acidic environment. Beneficial bacteria are more fragile and slow to reproduce in an aerobic environment, whereas competing microbes, such as yeast and mold, are hardy and can reproduce quickly with oxygen present. The Probiotic Jartm gives the LAB the anaerobic environment they need to quickly beat out the competing undesirable microbes which cause off-flavors at best, and spoilage at worst.
6. Starter cultures are not needed in The Probiotic Jar(tm). All the LAB necessary are present in fresh, organic produce. Adding whey to a vegetable culture introduces dairy strains of LAB, which will compete with the desirable strains of LAB, change the flavors, and limit the natural healthy spectrum of the LAB that develop. |
Tips for Success

Himalayan Pink Salt Available in Accessories
Cloudiness in the brine without mushiness or sliminess does not indicate a failed ferment. This cloudiness is normal with many vegetables, and can be expected with cucumber-dill pickles.* Bubbling and foaming is normal for fermenting. This indicates healthy active LAB activity. Bubbling may be hard to detect, and foaming is not always present. For example, beets tend to foam, and carrots do not tend to foam. Depending on the varieties of vegetables, and temperatures, your experience will vary. Many refrigerated ferments will last for more than a year if the lid is not opened, and then for three or four months while it is being consumed. *We are not microbiologists, so please use this information at your own risk. |

Refrigerator Magnet Available in Accessories
|
