Ingredients:
Garlic cloves (organic or non-irradiated) Jar: 1 Liter Jar (or smaller) Brine: 2% Ferment: 7 days at room temperature (68-72ºF) 
Preparation:
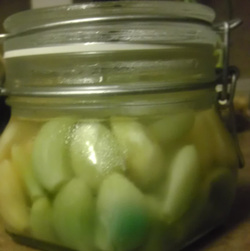
1. Prepare about 3 cups of 2% brine for a 1 Liter Jar. 2. Pour brine into Jar. 3. Peel garlic cloves (or just smack them with the flat side of a kitchen knife to loosen peels quickly) and put them into the Jar with the brine.* 4. Continue adding garlic until the cloves are almost up the the shoulder of the Jar. 5. Add additional brine if necessary to bring level up to just below the neck. 6. Place Brine (Submersion) Bowl, fill & insert the Airlock, lock the Jar & cover. 7. Leave at 70ºF for 7-10 days. 8. Move to refrigerator. Garlic is ready to use in about a month, and will continue to ferment slowly in the fridge for about six months. The more aged, the more wonderfully mild and delicious! Notes: *Peeling the garlic makes for a very nice looking jar of fermented garlic, but I don't enjoy peeling garlic one little bit. Some advice out there recommends heating garlic cloves in the oven to loosen the peels, but that will kill the LAB and prevent a healthy ferment, so that's not an option for us. I prefer the smacking method ~ not so pretty but it gets the job done! Garlic, while fermenting, sometimes turns a color such as blue, purple, or green. This is due to specific compounds in some varieties of garlic that are affected by acids and the fermenting process, and do not affect the flavor, nor do they indicate a problem with the ferment. We do, however, recommend that the garlic be fresh, and not sprouting as in this photo, if you desire a firmer garlic clove after fermenting. These cloves will be quite soft. The brine out of the fermented garlic Jar makes a very nice addition to mayonnaise to create aioli. I love the raw fermented garlic in my guacamole. The creative ways to use lacto-fermented garlic are endless!
11 Comments
Sue Mosier
2/16/2015 02:39:30 am
Hi, I am new to lacto-fermented garlic. I have read on some websites to leave it on the counter for 30 days before putting in the refrigerator. Would you be able to explain why there is a difference in the amount of time it is left on the counter? Thank you.
Reply
The Probiotic Jar
2/16/2015 02:56:16 am
Hi Sue,
Reply
Christine
11/3/2015 01:32:09 pm
Hi! Just wondering if there is a way to tell if garlic has or has not been irradiated-is all organic garlic safe? Thank you! Great site! I can't wait to get started with your jars & recipes! I have only done open type ferments & they are hit & miss. I can't tell you how much hard work & money has gone in the heap!
Reply
Karen
11/3/2015 01:53:03 pm
Hello Christine!
Reply
Mark Tankersley
4/24/2016 08:14:05 pm
I use a silicone garlic peeler like this one, which makes garlic peeling almost enjoyable!
Reply
Sara D.
8/7/2016 07:58:45 pm
You can put separated garlic cloves in two bowls held together like two halves of a sphere, shake a while, and the cloves bounce around until the skin comes off. No broken cloves either!
Reply
Harlén
2/21/2019 09:40:29 am
Hi, Karen.
Reply
Karen
4/20/2019 07:24:54 am
Hello Harlan!
Reply
Bonjour,
Reply
Leave a Reply. |
Recipe ListHere you will find the most delicious, health-boosting concoctions on planet earth! You are sure to experience both a delightful sensation on your taste buds as well as a happy tummy!
Beets, (Grated) with Clove, Cinnamon & Allspice Beet Kvass Brussel Sprouts Berry Syrup/Sauce Carrots (Grated) with Chocolate Mint Cabbage Juice Carrots & Beets with Rosemary & Thyme Carrot Sticks (Herbed or Plain) Carrot (Grated) with Chocolate Mint Carrots, Leeks, Ginger & Dill Dandelion Buds Dill Pickles (Traditional) Fire Cider Garden Medley Kvass Garlic Ginger, Shaved & Pickled Ginger, Beet & Kale Kvass Ginger Soda Ginger Bug (Starter) Granola Green Beans Lemons Mayonnaise Ranch Dressing Salsa ~ Chunky Tomato Sauerkraut Sauerkraut Juice Turmeric Root Tonic ~ Cold, Sinus & Flu Categories
All
How ToThe success of every recipe shared on this site is dependent on the proper application of anaerobic pickling techniques. These recipes are designed specifically to work in The Probiotic Jar. Please follow the instructions in the Quick Start Guide when creating these recipes. Archives
January 2016
|
 RSS Feed
