Before we get right into making Mayo, I want to point out a few safety-related ideas. In this recipe, I am using fresh fertilized pastured eggs that were plucked from under the free range healthy hen this very morning. If you are using store-bought eggs, you should have concerns about the safety of using raw eggs including the whites. If you must use store-bought eggs, go for organic eggs that are the freshest you can find, and use two or three yolks instead of one whole egg.
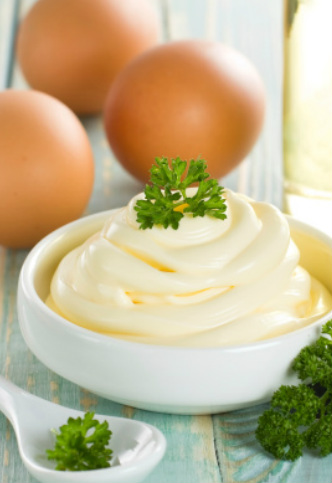
Ingredients: 1 large room temperature egg (add water to make 1/4 cup total egg & water [critical for emulsifying]) or two XL yolks or 3 L yolks 1 tsp. dry or prepared mustard 1 Tbs. fresh organic squeezed lemon juice 8 fl.oz. oil total: Choose a nice neutrally-flavored oil such as organic sunflower oil, or a light olive oil, or my new favorite, avocado oil 1.5 fl.oz. of your oil can be Expeller Pressed Coconut Oil from Tropical Traditions ~ melted but not hot (which in the refrigerator later will make your mayo a little bit stiffer, which I like) Salt to taste Jar: 1/2 Liter Jar holds 2 batches Brine: Not applicable Ferment: 3-5 hrs. (if you're very brave, with very fresh eggs, up to 24 hours) Temperature: 68-72º F Optional: Garlic brine 1 tsp. (to taste) or Fermented Lemon (use just the liquid from the ferment if you mind tiny bits of lemon blended into the mayo), added after fermenting before moving to refrigerator
Preparation:
* If you have a preferred method of making mayo, by all means use it. It can be tricky, and I failed at many attempts over the years to make mayo using all sorts of special blenders and food processors with drip mechanisms for drizzling the oil into the egg. My foolproof method above has worked every time, using the "aerator" blade that came with my L'Equip Stick Blender. Now that the L'Equip has been discontinued, I discovered the same blade on the Bamix. You can purchase the same Bamix we use here. The most important thing about mayo production is that both the oils and eggs are at room temperature ~ not too warm, not too cold. A couple hours on the counter to acclimate seems to be fine for the eggs, and after I melt the coconut oil, I put it in the freezer for 15 seconds at a time to cool it until it feels "cool" without re-solidifying. This seems to be the perfect combination of conditions that result in great mayonnaise. About the oils: The coconut oil I use is flavorless, and adds nice stiffness to the finished mayo in the fridge. The mayo will really carry the flavor of the other oils you choose, so the lighter, the better in terms of creating a substitute for store-bought mayo. Look for one low in polyphenols, harvested late in the season. The fresh organic lemon adds the acidity and brightness to the flavor, and the Lemon or Garlic Brine adds enough additional LAB and acidity to make this mayo last over 3 weeks in the fridge. Additional note 11/15/14: Recently I added quite a lot more fermented lemon in the end as an experiment, and I was just delighted by the flavor. It was so delicious I started letting friends taste it right off the spoon, and everyone agrees it's the best mayo ever! I chopped up 1/4 of a fermented lemon (the rind and all) in as small sized bits as possible, and added it to the mayo, blending thoroughly. In good conscience, I need to give credit to Linda Cox of Bread to Perfection for teaching me this technique. Thank you, Linda. My family thanks you, too! I'd love to know what you think! Please leave me a comment below. 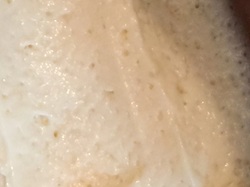
Here is a photo of my mayo after a few weeks in the refrigerator. I was surprised by a "foamy" sound when I scooped some out of the jar, and I looked closely and could easily see the bubbles formed by the fermentation process that continued in the refrigerator. I think that's really cool!
As a side note; there are usually not enough bubbles formed to see them, much less take a photo, so even if you cannot detect carbon dioxide formation, you can trust the process and know that fermentation has occurred. 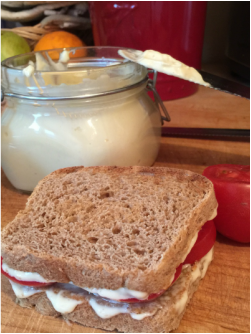
This has to be one of my favorite things to eat! I enjoy ripe tomatoes on real homemade whole wheat sourdough bread so much!
11 Comments
Katie
5/27/2014 03:10:49 am
If I made my mayo the other day without adding the whey can I just take it out of the fridge and add the whey today to ferment it, or is it too late now that it’s been prepared and refrigerated for a couple days? 5/27/2014 05:14:14 am
Generally speaking, non-fermented mayonnaise is only good in the refrigerator for four to seven days before it goes funky, so it is too late to ferment this mayonnaise.
Nicolette Dickerson
6/20/2014 04:48:20 am
Forgive me for not understanding, but this is the second post I've read about fermented mayonnaise, and I'm not understanding what people are actually doing to achieve a fermented end-product. Can you please explain this to me? Regular homemade mayo is excellent, but having it fermented makes it all-the-more healthier!!
Probiotic Jar (Karen)
1/30/2015 10:10:38 pm
Almost everything raw ferments at room temperature. Bacteria is everywhere, and given an optimal environment that impedes mold, lactic acid bacteria will thrive. :)
Karen Ryan
5/3/2019 01:21:31 pm
I think what Nicollete is asking, which is my question as well is how can the mayo ferment in just 3-5 hours. Can you really taste the difference?
Laura
11/5/2014 10:13:57 pm
What do you mean why you say 'Probiotic Jar'? Is that a type of product you sell or endorse? Thanks!
The Probiotic Jar
11/5/2014 10:51:59 pm
The Probiotic Jar is a vessel for anaerobic fermenting. Learn more by clicking the home page in the black menu bar on this page. :)
Phoebe Gainer
1/10/2017 09:15:35 am
I've made fermented mayo countless times and love it. I just found out that I don't tolerate eggs so my Naturopathic doctor has me off them for awhile.
Hi Phoebe,
Phoebe Gainer
1/10/2017 09:42:16 am
Thank you so much. I'll make two batches. One to eat now, and one that I'll put in the back of the fridge to observe how long it lasts. I'll report back ! Leave a Reply. |
Recipe ListHere you will find the most delicious, health-boosting concoctions on planet earth! You are sure to experience both a delightful sensation on your taste buds as well as a happy tummy!
Beets, (Grated) with Clove, Cinnamon & Allspice Beet Kvass Brussel Sprouts Berry Syrup/Sauce Carrots (Grated) with Chocolate Mint Cabbage Juice Carrots & Beets with Rosemary & Thyme Carrot Sticks (Herbed or Plain) Carrot (Grated) with Chocolate Mint Carrots, Leeks, Ginger & Dill Dandelion Buds Dill Pickles (Traditional) Fire Cider Garden Medley Kvass Garlic Ginger, Shaved & Pickled Ginger, Beet & Kale Kvass Ginger Soda Ginger Bug (Starter) Granola Green Beans Lemons Mayonnaise Ranch Dressing Salsa ~ Chunky Tomato Sauerkraut Sauerkraut Juice Turmeric Root Tonic ~ Cold, Sinus & Flu Categories
All
How ToThe success of every recipe shared on this site is dependent on the proper application of anaerobic pickling techniques. These recipes are designed specifically to work in The Probiotic Jar. Please follow the instructions in the Quick Start Guide when creating these recipes. Archives
January 2016
|
 RSS Feed
